
Lice are persistent pests that can quickly transform your peaceful bedroom into a place of discomfort and distress. When these tiny insects invade your sleeping environment, they don’t just cause physical itching—they also challenge your sense of cleanliness and security. Mattresses, with their many seams and soft fibers, can provide the perfect hiding places for lice and their eggs if steps aren’t taken immediately.
Treating a mattress for lice may seem daunting at first, but with the right knowledge and tools, you can reclaim your restful space and protect your family’s health. It’s not only about removing lice during an outbreak; it’s also about understanding how to minimize risks and prevent recurring infestations. This guide on how to treat mattress for lice will walk you through essential tools, detailed steps for decontaminating your mattress, ongoing maintenance tips, and answers to common questions, empowering you to maintain a clean and lice-free bedroom.
Tools and Materials You’ll Need
Before you begin the process, gather all the necessary tools and materials for a thorough and effective cleanup:
- Vacuum cleaner with an upholstery or crevice attachment
- Steam cleaner (if available)
- Hot water and a quality laundry detergent
- Lint roller with extra adhesive sheets
- Disinfectant spray approved for fabric use
- Protective gloves
- Mattress encasement or cover (preferably zippered and allergen-proof)
- Fresh bed linens and pillowcases
- Soft-bristle brush
- Plastic bags for transporting infested bedding
Having these items ready will ensure each stage of the cleaning process is carried out smoothly and efficiently, preventing cross-contamination and maximizing your results.
8 Simple Step-By-Step Guidelines on How to Treat Mattress for Lice
Step 1: Remove and Secure All Bedding
Start by carefully removing all sheets, pillowcases, blankets, and mattress covers from your bed. Immediately place these items in large plastic bags to avoid shaking lice or their eggs onto the floor or other areas of your home.
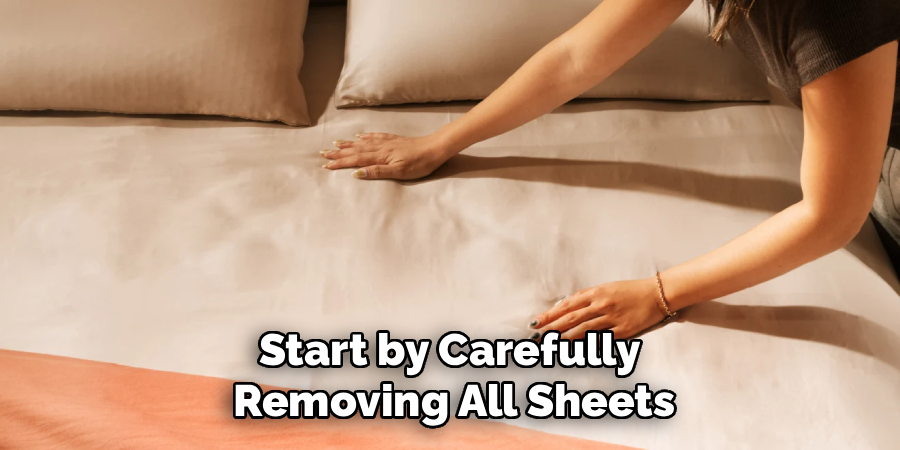
Seal the bags tightly and transport them directly to the laundry room. Taking this initial step seriously reduces the risk of lice spreading to other furniture or areas, making your cleaning efforts more effective in the long run.
Step 2: Wash Bedding in Hot Water
Once you have secured the infested linens, wash them in hot water at a temperature of at least 130°F (54°C). Add a reliable laundry detergent and, if suitable for the fabrics, consider running them through the longest cycle for maximum cleansing.
After washing, dry the items at the highest heat setting recommended by the manufacturer. The combination of high temperatures in both washing and drying will effectively kill both lice and their eggs, ensuring your bedding is safe to use again.
Step 3: Vacuum the Entire Mattress Thoroughly
Put on a fresh pair of protective gloves before handling your mattress. Using a vacuum cleaner with an upholstery or crevice attachment, methodically vacuum every part of the mattress—surfaces, sides, seams, buttons, and tufts.
Work slowly and pay particular attention to areas where dirt or debris may accumulate, such as stitching and fold lines. Once finished, immediately dispose of or empty the vacuum canister contents outside the home to prevent recontamination or escape of lice.
Step 4: Use a Lint Roller for Detailed Cleanup
Go over the mattress surface with a high-adhesion lint roller, focusing on seams, crevices, edges, and any other area where lice or eggs may be hidden. Replace adhesive sheets as soon as they become full or lose their stickiness.

This simple tool can capture small particles missed by your vacuum and help ensure that nothing living remains on the mattress. Repeat this step as many times as necessary until no debris, hair, or particles appear on a fresh lint roller sheet.
Step 5: Steam Clean the Mattress
If you have access to a steam cleaner, fill it with water and allow it to reach maximum temperature. Glide the steam cleaner slowly across the mattress surface, holding it close enough to saturate the fabric but not so near as to soak it.
The high temperature from the steam will penetrate into the mattress, killing lice and eggs deep within its fibers. Make sure to cover all areas evenly, and once complete, set the mattress upright in a ventilated space to dry thoroughly before use.
Step 6: Treat With a Mattress-Safe Disinfectant
Select a disinfectant spray that is labeled as safe for use on mattresses and upholstery. Lightly mist the entire surface, including the sides and seams, taking care not to saturate any areas.
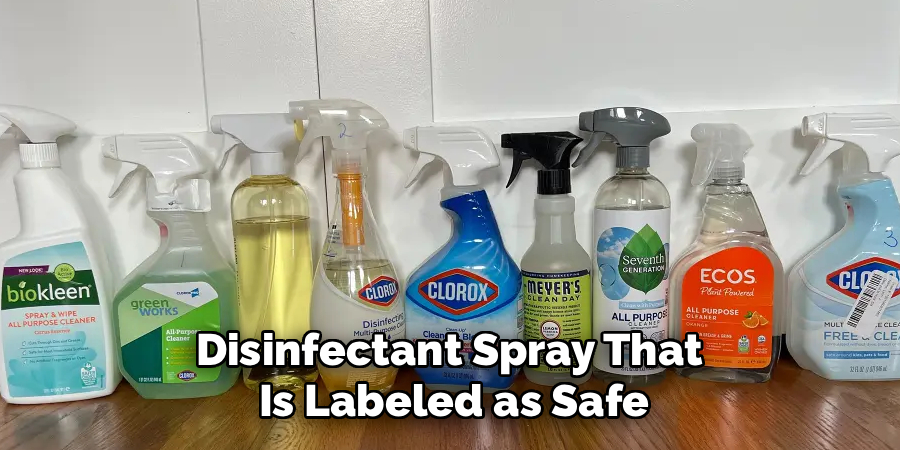
Allow the spray to dry naturally according to the manufacturer’s directions. Disinfectant not only helps eliminate any remaining bacteria or germs but also leaves your mattress feeling and smelling cleaner, offering peace of mind after your deep-cleaning routine.
Step 7: Encase the Mattress
Once the mattress is clean and dry, slide a clean, zippered mattress encasement over it. This barrier prevents lice from escaping or entering and helps interrupt their life cycle, particularly if any manage to survive cleaning.
Keep the encasement on for at least two weeks and wash it regularly as directed. Zippered covers also reduce allergen exposure and make routine cleaning easier in the future, serving as ongoing protection against both lice and other pests.
Step 8: Replace With Fresh, Secure Bed Linen
Finish by outfitting your mattress with freshly laundered sheets, pillowcases, and blankets. Consider choosing fitted sheets with all-around elastic or deep pockets for a snug fit that stays in place, even if you move during sleep.
New linens minimize reinfestation risks since old, untreated fabrics are more likely to harbor eggs. Double-check that all bedding is tucked in tightly, which not only improves comfort but also discourages pests from finding a place to hide.
Following these steps on how to treat mattress for lice will help ensure a successful eradication of these pesky insects. Additionally, it’s important to follow up with regular cleaning and maintenance to prevent future infestations.
Regular Maintenance Check
Maintaining a lice-free mattress is much easier when regular checks are part of your cleaning schedule. Inspect your mattress, pillows, and bed frame every two to four weeks for signs of lice—such as itching, small white eggs (nits), or bite marks on the skin. Whenever possible, air your mattress outside in direct sunlight, as heat and UV rays can further reduce the risk of lingering pests.
Vacuum the mattress routinely, and wash bed linens at high heat every week or two. Replace or wash your encasement and pillow covers regularly. Finally, remind all household members of simple hygiene practices, like not sharing hairbrushes or hats, to reduce the chance of lice returning to your clean and safe bedroom.
Frequently Asked Questions
Q1: How Long Can Lice Live On a Mattress?
Lice cannot survive for more than 1-2 days without access to a human scalp for feeding. This means they have a limited window to remain alive on your mattress, but during this time, it’s still possible for them to cause reinfestation. For complete peace of mind, it’s best to treat your mattress and bedding immediately and use a mattress encasement for at least two weeks to ensure no surviving lice remain.
Q2: Can I Use Any Chemical Spray To Kill Lice on a Mattress?
Only use disinfectant sprays that specifically state they are safe for mattresses and do not leave harmful residues. Not all pesticides or cleaning sprays are appropriate for use on sleeping surfaces, as they might cause skin irritation or respiratory issues. Always follow the manufacturer’s instructions and when in doubt, favor heat-based treatments and vacuuming, as these are both effective and non-toxic.

Q3: What Is The Best Fabric For Preventing Lice On Bedding?
Fitted sheets with deep pockets and all-around elastic are ideal for keeping bed linen tightly secured, which helps prevent lice from hiding or moving between bedding and mattress. Mattress covers or encasements made from tightly woven fabric are most effective for blocking pests. Combine these with frequent hot-water washing and drying to create a consistently inhospitable environment for lice.
Q4: How Often Should I Inspect My Mattress And Bedding For Lice?
It’s recommended to do a detailed check at least once per month, or more frequently if you have school-aged children or have previously dealt with infestations in the household. During a known outbreak, inspect bedding and mattresses every few days and increase cleaning frequency until the problem is fully controlled. Early detection reduces the spread and prevents serious discomfort for everyone in the home.
Conclusion
Tackling a mattress infested with lice is a challenge that requires patience, precision, and the right information. By gathering essential tools and following a detailed, step-by-step plan on how to treat mattress for lice—from stripping the bed and vacuuming, to laundering at high temperatures and deploying protective encasements—you regain control over your sleep space and health. Regular inspections and consistent hygiene practices keep lice at bay both now and in the future.
A clean, well-maintained mattress is not only vital for physical comfort but also for overall family wellness. With commitment and routine, you can ensure that your sleeping environment remains a haven of rest—free from pests and full of peace of mind. Remember, vigilance is your best defense; treat your mattress at the first sign of lice, follow up with regular checks, and teach others in your home the importance of ongoing cleanliness. Your efforts will be rewarded with better sleep, higher confidence, and a truly healthy bedroom.
About
Construct Fixes is a distinguished figure in the world of Diy design, with a decade of expertise creating innovative and sustainable Diy solutions.
His professional focus lies in merging traditional craftsmanship with modern manufacturing techniques,
fostering designs that are both practical and environmentally conscious. As the author of diy,
constructfixes delves into the art and science of construction-making, inspiring artisans and industry professionals alike.
Education RMIT University
(Melbourne, Australia) Associate Degree in Design (Construct Fixes) Focus on sustainable design, industry-driven projects,
and practical craftsmanship. Gained hands-on experience with traditional and digital manufacturing tools, such as CAD and CNC software.
Nottingham Trent University
(United Kingdom) Bachelor’s in constructfixes.com and Product Design (Honors) Specialized in product design with a focus on blending creativity with production
techniques. Participated in industry projects, working with companies like John Lewis and Vitsoe to gain real-world insights.
Publications and Impact
In diy, Construct Fixes his insights on indoor design processes, materials, and strategies for efficient production.
His writing bridges the gap between artisan knowledge and modern industry needs, making it a must-read for both budding designers and seasoned professionals.